コマンド画面は一通り作ったので、いくつかスクリプトを作成してコマンドを遷移するようにしていきたいと思います。
【2DRPG】コマンドを切り替えるスクリプトを作成する【Unity】
どのボタンが選択されているのかを分かるようにする
まずは、どのボタンが選択されているのかが分かるように「CommandPanelButtonScript」を作成します。
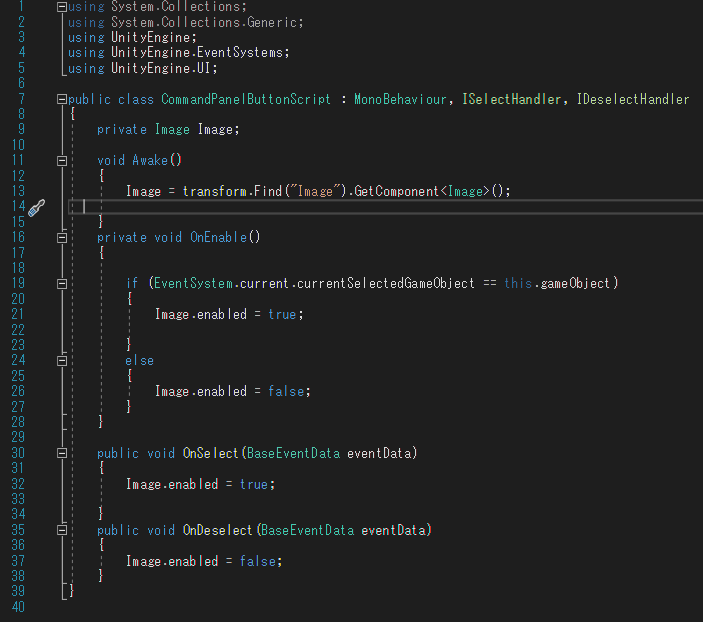
「購入する」「売却する」等といったボタンにアタッチするスクリプトですが、選択されているボタンの画像をアクティブにし、それ以外のボタンは非アクティブにするだけです。
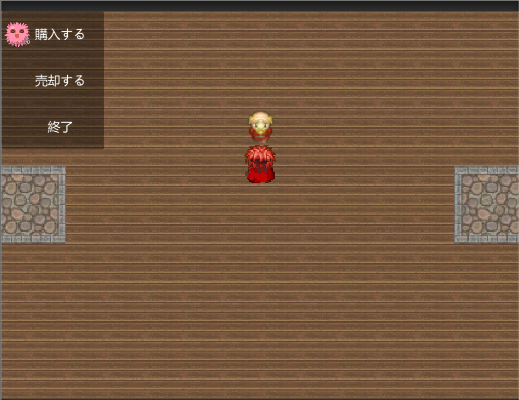
作成したら設定する必要があるボタンに対してアタッチします。最終的には上の画像のように選択されているボタンのみアイコンが表示されるので、何が選択されているのかすぐに分かると思います。
NPCに接触したらコマンドを開くようにする
どのタイミングでコマンドを開くのかといったきっかけになる部分ですね。
この辺は、個人で処理の仕方が異なってくると思いますが、私の場合だと上の画像にあるようにプレイヤーがNPCに接触したらFungusの会話コマンドを実行し、その後鍛冶屋コマンドを開きます。
using System.Collections; | |
using System.Collections.Generic; | |
using UnityEngine; | |
using UnityEngine.EventSystems; | |
using UnityEngine.UI; | |
public class BlackSmithCommandScript : MonoBehaviour | |
{ | |
// コマンド用UI | |
[SerializeField] | |
private GameObject commandUI = null; | |
private playermove PlayerScript; | |
// Start is called before the first frame update | |
void Start() | |
{ | |
PlayerScript = GameObject.FindWithTag("Player").GetComponent<playermove>(); | |
} | |
// Update is called once per frame | |
void Update() | |
{ | |
} | |
public void OpenCommand() | |
{ | |
commandUI.SetActive(!commandUI.activeSelf); | |
} | |
// CommandScriptから呼び出すコマンド画面の終了 | |
public void ExitCommand() | |
{ | |
EventSystem.current.SetSelectedGameObject(null); | |
commandUI.SetActive(!commandUI.activeSelf); | |
PlayerScript.SetState(playermove.State.Normal); | |
} | |
} |
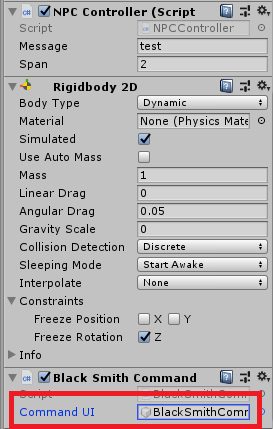
そういった際のサンプルスクリプトとなります。NPCコントローラースクリプトやこの後作成するコマンドスクリプトより、コマンドの表示・非表示を行います。
このスクリプトは、対象となるオブジェクトにアタッチしてインスペクタからキャンバスを設定します。
コマンドスクリプトを作成する
コマンドを開いた後の処理を行うためのスクリプト「EquipCommandScript」を作成します。
using System.Collections; | |
using System.Collections.Generic; | |
using System.Text; | |
using UnityEngine; | |
using UnityEngine.EventSystems; | |
using UnityEngine.UI; | |
public class EquipCommandScript : MonoBehaviour | |
{ | |
public enum CommandMode | |
{ | |
CommandPanel, | |
EquipPanelSelect, | |
EquipListPanel, | |
BuyCheckPanel | |
} | |
private CommandMode currentCommand; | |
// 鍛冶屋コマンドスクリプト | |
private BlackSmithCommandScript BlackSmithCommandScript; | |
// 最初に選択するButtonのTransform | |
private GameObject firstSelectButton; | |
// 2番目に選択するButtonのTransform | |
private GameObject seccondSelectButton; | |
// コマンドパネル | |
private GameObject commandPanel; | |
// 何の装備を選択するか | |
private GameObject EquipSelectPanel; | |
// 選択した装備の一覧を表示するパネル | |
private GameObject EquipListPanel; | |
// 購入するかどうかの確認パネル | |
private GameObject BuyCheckPanel; | |
// 武器ボタンを表示する場所 | |
private GameObject content; | |
// 情報表示パネル | |
private GameObject informationPanel; | |
// 装備品のボタンのプレハブ | |
[SerializeField] | |
private GameObject EquipPanelButtonPrefab = null; | |
// コマンドパネルのCanvasGroup | |
private CanvasGroup commandPanelCanvasGroup; | |
// 装備の種類を選択するパネルのCanvasGroup | |
private CanvasGroup EquipSelectPanelCanvasGroup; | |
// 選択された装備品の一覧を表示するパネルのCanvasGroup(武器・防具・アクセ) | |
private CanvasGroup EquipListPanelCanvasGroup; | |
// 購入するかどうかの確認パネルのCanvasGroup | |
private CanvasGroup BuyCheckPanelCanvasGroup; | |
// 装備する種類名(武器とか防具とか) | |
private Text BlackSmithNameText; | |
// 情報表示タイトルテキスト | |
private Text informationTitleText; | |
// 情報表示テキスト | |
private Text informationText; | |
[SerializeField] | |
private PartyStatus partyStatus = null; | |
[SerializeField] | |
private KajiyaWeapon weaponList = null; | |
// 装備選択のボタンのプレハブ | |
//[SerializeField] | |
// private GameObject BlackSmithPanelButtonPrefab = null; | |
// 装備品購入時のボタンのプレハブ | |
[SerializeField] | |
private GameObject BuyCheckButtonPrefab = null; | |
// 武器一覧 | |
private List<GameObject> EquipPanelButtonList = new List<GameObject>(); | |
void Awake() | |
{ | |
// コマンド画面を開く処理をしているBlackSmithCommandScriptを取得 | |
BlackSmithCommandScript = GameObject.FindWithTag("kajiya").GetComponent<BlackSmithCommandScript>(); | |
// 現在のコマンドを初期化 | |
currentCommand = CommandMode.CommandPanel; | |
// 階層を辿ってを取得 | |
firstSelectButton = transform.Find("CommandPanel/BuyButton").gameObject; | |
seccondSelectButton = transform.Find("EquipSelectPanel/WeaponButton").gameObject; | |
// パネル系 | |
commandPanel = transform.Find("CommandPanel").gameObject; | |
EquipSelectPanel = transform.Find("EquipSelectPanel").gameObject; | |
EquipListPanel = transform.Find("EquipListPanel").gameObject; | |
content = EquipListPanel.transform.Find("Mask/Content").gameObject; | |
BuyCheckPanel = transform.Find("BuyCheckPanel").gameObject; | |
informationPanel = transform.Find("InformationPanel").gameObject; | |
// CanvasGroup | |
commandPanelCanvasGroup = commandPanel.GetComponent<CanvasGroup>(); | |
EquipSelectPanelCanvasGroup = EquipSelectPanel.GetComponent<CanvasGroup>(); | |
EquipListPanelCanvasGroup = EquipListPanel.GetComponent<CanvasGroup>(); | |
BuyCheckPanelCanvasGroup = BuyCheckPanel.GetComponent<CanvasGroup>(); | |
// 何の武器か | |
BlackSmithNameText = EquipListPanel.transform.Find("EquipNamePanel/Text").GetComponent<Text>(); | |
// 情報表示用テキスト | |
informationTitleText = informationPanel.transform.Find("Title").GetComponent<Text>(); | |
informationText = informationPanel.transform.Find("Information").GetComponent<Text>(); | |
} | |
private void OnEnable() | |
{ | |
// 現在のコマンドの初期化 | |
currentCommand = CommandMode.CommandPanel; | |
// コマンドメニュー表示時に他のパネルは非表示にする | |
EquipSelectPanel.SetActive(false); | |
EquipListPanel.SetActive(false); | |
BuyCheckPanel.SetActive(false); | |
informationPanel.SetActive(false); | |
commandPanelCanvasGroup.interactable = true; | |
EquipSelectPanelCanvasGroup.interactable = false; | |
BuyCheckPanelCanvasGroup.interactable = false; | |
EventSystem.current.SetSelectedGameObject(firstSelectButton); | |
} | |
// Start is called before the first frame update | |
void Start() | |
{ | |
} | |
// Update is called once per frame | |
private void Update() | |
{ | |
// キャンセルボタンを押した時の処理 | |
if (Input.GetButtonDown("Cancel")) | |
{ | |
// コマンド選択画面時 | |
if (currentCommand == CommandMode.CommandPanel) | |
{ | |
BlackSmithCommandScript.ExitCommand();//コマンドを閉じる | |
gameObject.SetActive(false); | |
} | |
else if (currentCommand == CommandMode.EquipPanelSelect) | |
{ | |
EquipSelectPanelCanvasGroup.interactable = false; | |
EquipSelectPanel.SetActive(false); | |
commandPanelCanvasGroup.interactable = true; | |
currentCommand = CommandMode.CommandPanel; | |
EventSystem.current.SetSelectedGameObject(firstSelectButton); | |
} else if (currentCommand == CommandMode.EquipListPanel) | |
{ | |
EquipListPanelCanvasGroup.interactable = false; | |
EquipListPanel.SetActive(false); | |
informationPanel.SetActive(false); | |
// 装備品パネルを削除 | |
for (int i = content.transform.childCount - 1; i >= 0; i--) | |
{ | |
Destroy(content.transform.GetChild(i).gameObject); | |
} | |
EventSystem.current.SetSelectedGameObject(seccondSelectButton); | |
EquipSelectPanelCanvasGroup.interactable = true; | |
currentCommand = CommandMode.EquipPanelSelect; | |
} | |
} | |
} | |
// 選択したコマンドで処理を分ける | |
public void SelectCommand(string command) | |
{ | |
if (command == "Buy")//購入ボタンが選択 | |
{ | |
currentCommand = CommandMode.EquipPanelSelect; | |
commandPanelCanvasGroup.interactable = false; | |
} | |
if(command == "Sell")//売却ボタンが選択 | |
{ | |
currentCommand = CommandMode.EquipPanelSelect; | |
commandPanelCanvasGroup.interactable = false; | |
} | |
// 階層を一番最後に並べ替え | |
EquipSelectPanel.transform.SetAsLastSibling(); | |
EquipSelectPanel.SetActive(true); | |
EquipSelectPanelCanvasGroup.interactable = true; | |
EventSystem.current.SetSelectedGameObject(seccondSelectButton); | |
} | |
public void WeaponSelectCommand(string command) | |
{ | |
if(command == "buki")//武器ボタンが押された | |
{ | |
currentCommand = CommandMode.EquipListPanel; | |
EquipSelectPanelCanvasGroup.interactable = false; | |
BlackSmithNameText.text = ("武器一覧"); | |
GameObject EquipButtonIns; | |
// 武器リストのボタンを作成 | |
foreach (var weapon in weaponList.WeaponList) | |
{ | |
EquipButtonIns = Instantiate<GameObject>(EquipPanelButtonPrefab, content.transform); | |
EquipButtonIns.transform.Find("EquipText").GetComponent<Text>().text = weapon.WeaponName; | |
EquipButtonIns.transform.Find("GoldText").GetComponent<Text>().text = weapon.Gold.ToString(); | |
EquipButtonIns.GetComponent<EquipButtonScript>().SetParam(weapon); | |
// EquipButtonIns.GetComponent<Button>().onClick.AddListener(() => CreateItemPanelButton(member)); | |
} | |
} | |
if(command == "bougu")//防具ボタンが押された | |
{ | |
currentCommand = CommandMode.EquipListPanel; | |
EquipSelectPanelCanvasGroup.interactable = false; | |
} | |
if(command == "akuse") | |
{ | |
currentCommand = CommandMode.EquipListPanel; | |
EquipSelectPanelCanvasGroup.interactable = false; | |
} | |
EquipListPanel.transform.SetAsLastSibling(); | |
EquipListPanel.SetActive(true); | |
EquipListPanelCanvasGroup.interactable = true; | |
informationPanel.SetActive(true); | |
} | |
} |
結構長いコードになっていますが、行っていることはそこまで難しくはないと思います。
まずは、プレイヤーがどのコマンドにいるのかを識別するために列挙型「Command Mode」を作ります。
- CommandPanel・・・最初のコマンドを開いた初期状態。
- EquipPanelSelect・・・どの装備品を選択するのか
- EquipListPanel・・・選択された装備品のリストを表示する
- BuyCheckPanel・・・購入するのか確認するパネル
とりあえず4つ作成していますが、本来ならもっとたくさんあります。付け加えたい際は、ここに追記するようにしていきます。
フィールドでは、今挙げたコマンドの状態に対応するPanelやCanvasGroupを作成します。
Awakeメソッドでは、階層を辿ってパネルやCanvasGroup等を取得します。
OnEnableメソッドは、ゲームオブジェクトがアクティブになった際に処理を実行します。
コマンドの初期化や、表示する必要のないパネルを非表示にするようにします。最初に表示されるコマンドは項目の選択を行えるようにするためinteractableをtrueにします。
Updateメソッド
Updateメソッドでは、キャンセルされた場合の処理を記述します。
最初のコマンド画面からキャンセルが押されたら、画面を閉じるようにするため先ほど作成しておいたスクリプトのExitCommandメソッドを実行します。
装備品パネルを開いていた状態でキャンセルされた場合は、パネルを削除するようにします。
EventSystem.current.SetSelectedGameObjectで各パネルに対応するボタンオブジェクトを設定するようにしています。
SelectedCommandメソッド
このメソッドでは、購入ボタンが押されたのか、売却ボタンが押されたのかをチェックします。厳密には終了ボタンが押された際もありますけどね。終了の場合はコマンドを閉じるだけでOKです。
後ほどボタンの設定を行いますが、受け取った引数によって処理を分けるようにします。
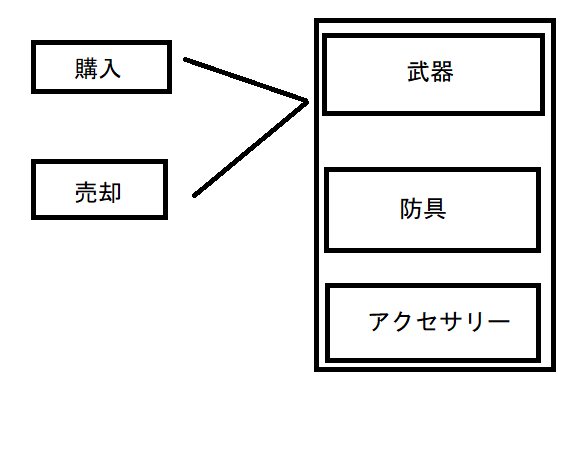
ちなみに、画像の通りどちらのボタンが押されても同じコマンド画面に切り替わるので、現在の仕様なら同じ処理でも構いません。
今後何かしら処理を追加する必要がある際の事を考えて、このような記述にしています。
WeaponSelectCommandメソッド
どの種類の装備品を押されたのかをチェックします。
今回は、武器ボタンが押された際を例にとって進めていきます。
foreach文を使って登録されているアイテムのインスタンスを作成して表示します。
武器データは後ほどScriptableObjectを使って作成します。
アイテムの情報を表示するためinformationPanelをアクティブにします。
作成したスクリプトはBlackSmithCommand(キャンバス)にアタッチしておきます。
アイテムデータを作成する
まずは、アイテムデータをScriptableObjectで作成していきます。
ScriptableObjectの使い方については、以前解説していましたので参考にしてください。
using System; | |
using System.Collections; | |
using System.Collections.Generic; | |
using UnityEngine; | |
[Serializable] | |
[CreateAssetMenu(fileName = "Item", menuName = "CreateItem")] | |
public class Item : ScriptableObject | |
{ | |
public enum Type | |
{ | |
WeaponAll, | |
ArmorAll | |
} | |
[SerializeField] | |
public Type itemType = Type.WeaponAll; | |
[SerializeField] | |
private string kanjiName = ""; | |
[SerializeField] | |
private string hiraganaName = ""; | |
[SerializeField] | |
private string information = ""; | |
// アイテムの種類 | |
public Type GetItemType() | |
{ | |
return itemType; | |
} | |
// アイテムの漢字名 | |
public string GetKanjiName() | |
{ | |
return kanjiName; | |
} | |
// アイテムの平仮名 | |
public string GetHiraganaName() | |
{ | |
return hiraganaName; | |
} | |
// アイテム情報 | |
public string GetInformation() | |
{ | |
return information; | |
} | |
} |
こんな感じでItemスクリプトを作成します。
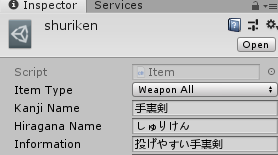
「Create」→「CreateItem」から3つほど武器データを作成しました。
続けて、アイテムをリスト化して表示するためのスクリプトを作成します。
using System; | |
using System.Collections; | |
using System.Collections.Generic; | |
using System.Linq; | |
using UnityEngine; | |
using UnityEngine.UI; | |
[CreateAssetMenu(fileName = "Weapon", menuName = "CreateKajiyaWeaponList")] | |
public class KajiyaWeapon : ScriptableObject | |
{ | |
// 表示する武器一覧 | |
public List<Kajiya> WeaponList = new List<Kajiya>(); | |
} | |
[Serializable] | |
public class Kajiya | |
{ | |
public Item Weapon; | |
public string WeaponName; | |
public int Gold; | |
public string infotext; | |
} | |
「Create」→「CreateKajiyaWeaponList」を作成して今作ったアイテムデータを登録します。
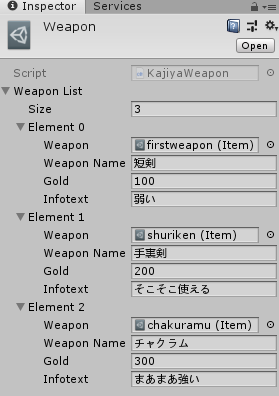
Weapon Nameはタイトル、Goldはゴールド、infotextはアイテムの情報を入力します。
EquipPanelButtonを作成する
アイテムリストを表示するボタンを作成します。
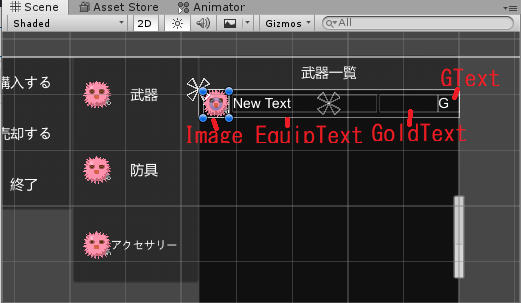
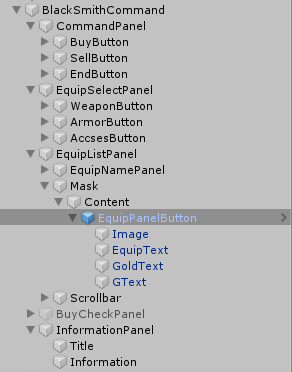
ボタンに元々設定してあるImageのチェックを外して、アイコン用のイメージ画像とテキストを3つ子要素として作成します。またTransitionは「None」にしておきます。
EquipTextには先ほどのWeapon Nameが、GoldTextにはゴールドを表示させるようにします。GTextはテキスト欄に「G」と入力しているだけですね。
それぞれの幅やボタンのサイズなどはお任せします。
ボタンにはCommandPanelButtonScriptをアタッチします。
また、選択されているボタンのアイテム情報を表示させるための「EquipButtonScript」を作成します。
このスクリプトもEquipPanelButtonにアタッチします。ここまで出来たらプレハブ化してヒエラルキーウィンドウにあるボタンは削除しておきます。
キャンバスと購入ボタン等のインスペクタの設定
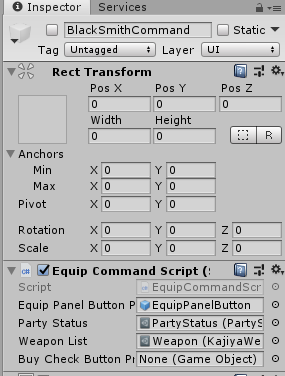
EquipCommandScriptをアタッチしておいたキャンバスを選択して、今作成したボタンのプレハブやアイテムデータを設定します。PartyStatusは特に関係ないのでスルーして構いません。
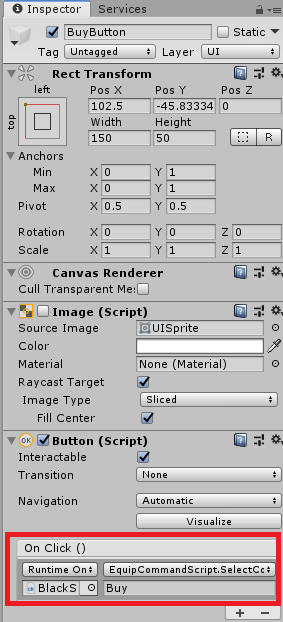
購入ボタンを押したらEquipCommandScriptのSelectCommandメソッドを実行するようにします。
武器ボタンの場合は、WeaponSelectCommandメソッドを設定します。後はそれぞれテキスト入力欄にスクリプトから指定しておいた文字を入力します。
入力コマンドの設定
どのボタンがキャンセルに対応するのかなどを設定するためには「Edit」→「Project Settings」→「Input」を開きます。
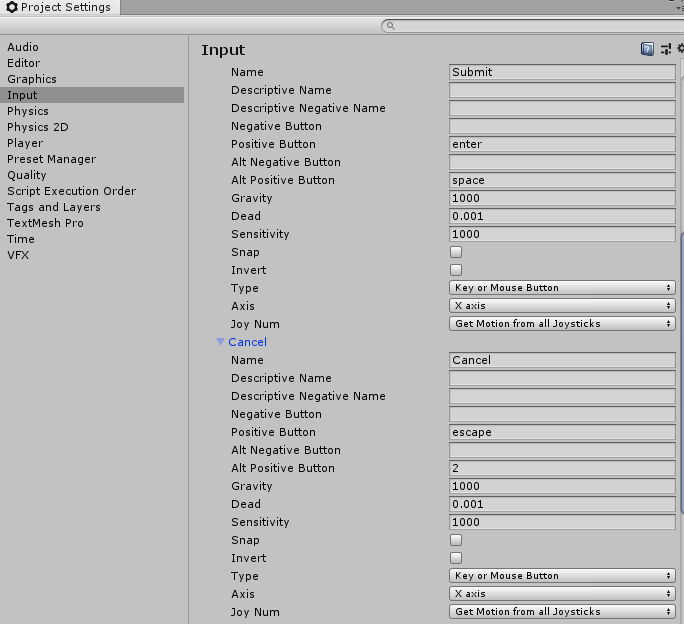
私の設定画面はこのようにしています。この辺は好きなボタンやジョイスティックで操作出来るように設定してもらえればと思います。
ここまで出来たらキャンバスを非表示にした状態でゲームを実行してみます。
まとめ
今回は、コマンドの遷移に関わる処理を実装しました。
購入ボタンを押して武器リストを表示するまでの一連の流れについて進めてきましたが、同じような工程で防具やアクセサリーリストも表示させることが出来ると思います。
全ての作業を1つの記事にしようとすると膨大な量となってしまうので割愛していますが、まだまだ鍛冶屋だけでも実装するべき事柄がたくさんあるので、やはりRPGの制作は結構大変です。